ips_cam 
An Indoor Positioning System based on V4L2 USB Cameras
This package is a modification, extension and mutation of the ROS2 usb_cam package. Given offline calibration and other setup (see below), ips_cam tracks multiple targets in the camera FOV which are adorned with ARUCO markers. It is assumed these markers physically lie parallel to a single plane (i.e., the floor), and are offset by a known, tag-specific height. An example is one or more robots (of possibly different heights) moving on the floor, each bearing a visible ARUCO tag at a fixed and known height - parallel to the floor at all times. ips_cam streams the orientation and position of each tag (as a ROS PoseStamped topic). Much like GPS, IPS (or perhaps better LPS!) is intended to be a ubiquitous position service - the IPS camera should be observing the robot work area and this ROS2 node should be running on dedicated IPS hardware - not (directly) as part of a robot or its perception stack.
It is assumed that scene lighting, tag (robot) velocities and camera exposure are such that tag motion is sufficiently frozen in each frame to allow accurate tag detection and localization via ARUCO tag algorithms in OPENCV. As of time of writing, testing on moving objects has been done with tags on rotating platforms and tags manually moved across the FOV via monofilament - at “modest” speeds. Also, given some adjustment of exposure (setting to manual and experimenting), a Simulink-based controller for a differential drive robot does not move the robot so fast that ips_cam fails to track accurately - more to come on this! Fast moving robots will demand a different - possibly simpler - image processing algorithm for robot detection and localization. Or an entirely different approach! You can always set camera parameters under the hood of ips_cam using v4l2, e.g., to track my differential drive robot in motion, I can do:
v4l2-ctl --set-ctrl=auto_exposure=1
v4l2-ctl --set-ctrl=exposure_time_absolute=75
which, rumor has it, is setting my camera exposure to 75 times 100 microseconds or 7.5 ms. This is enough to give fairly faithful tracking given the lighting in my kitchen. As I said, more on this later.
Unlike usb_cam, it is not the intention of ips_cam to act as a publisher of camera frames. It is possible that some future diagnostic functions might end up providing frames (or a few images) in some way. Two primary design principles of ips_cam are:
- maximize frame rate
- maximize image quality/resolution for ARUCO tag pose determination
- allow for change of image stream resolution separately from calibration image resolution
In order to address these concerns, ips_cam is designed to process the image stream at high resolution and frame rate at the edge. To this end, V4L2 buffering is used to provide high resolution images. Each high resolution image buffer element is converted/copied to monochrome via OPENCV. The buffer element is then returned to the V4L2 circular buffer. Detection and localization of ARUCO tags then occurs via OPENCV on each monochrome frame, and tag poses are published to the ROS2 network. This means no transport of large images occurs over the ROS2 network - the image stream only needs to make it to the edge compute resource running ips_cam.
Algorithm
ips_cam has 3 principle internal functions:
- Establishing of Indoor Coordinate System (ICS)
- (streaming) ARUCO tag detection and localization in the image
- (streaming) tag pose estimation in the ICS.
ARUCO tag detection is entirely accomplished by calls to OPENCV. This involves detecting the (ordered) corners of tags in the image. This is done in such a way that the orientation of the tag can also be determined. In order to get the final tag orientation, the corners of the image are converted to the ICS and fit via a rigid scale/rotation transform via least-squares. In this way we apply our constraints that each tag lies in a plane parallel to the floor at a fixed height.
Conversion of image coordinates to the ICS deserves some elaboration. I refer to the following pdf document produced in latex/TexStudio (this makes the equations much easier to produce).
Tested ROS 2 Distros and Platforms
This package has been tested - i.e. the unit and functional tests run - on a range of recent ROS2 distros (see the build and test actions / CI). Note, however, that V4L2 support for any given camera is likely problematic - due to the fact that cameras do not necessarily support the same control parameters in the same way. ips_cam has been developed with several cameras. Development began with the Microsoft LifeCam Studio, but was refined and adapted for use with the Logitech C920 and the Logitech MX Brio - primarily for higher image resolution. It is likely that other cameras support for specific camera controls and image formats varies, so it should not be expected that any camera will work out of the box. It might be hoped, however! It should generally not be too difficult to fork this code, do some camera spelunking with v4l2-ctl (see below), and update the code to support your camera in detail.
Windows and Mac platforms have not been tested against or even attempted. Presumably the biggest hurdle would be the platform-specific replacement for V4L2 for these platforms. The package was developed on an x86-64 platform and a Raspberry Pi 4, both running Ubuntu 22.04 and ROS2 Humble.
Building from Source
Clone/Download the source code into your workspace:
cd /path/to/colcon_ws/src
git clone https://github.com/StuartGJohnson/ips_cam.git
Once downloaded and ensuring you have sourced your ROS 2 underlay, e.g.:
source /opt/ros/humble/setup.bash
go ahead and install the dependencies:
cd /path/to/colcon_ws
rosdep install --from-paths src --ignore-src -y
From there you should have all the necessary dependencies installed to compile the ips_cam package:
cd /path/to/colcon_ws
colcon build
source /path/to/colcon_ws/install/setup.bash
Be sure to source the newly built packages after a successful build.
Once sourced, you should be able to run the package as shown below.
I worked on development with VSCode on linux. While getting VSCode to function adequately takes some time for a given project, once the proper .vscode files are set up and extensions installed and adjusted, the experience of coding and testing is probably worth all the effort - depending on how much work there is to be done recoding. I made use of the following extensions:
- C/C++
- C/C++ Extension Pack
- C/C++ Themes
- C++ TestMate
- CMake Tools
- OpenCV C++ Image
- ROS
- ROS2
Note there are numerous semi-mysterious steps in getting VSCode to wake up to your codebase. A parent repo (with a ros workspace) which was used to develop this package will be made public on github and linked here. That repo contains a .vscode directory with many useful tidbits.
Configuration
ips_cam_node requires a collection of parameters to run. These settings are all defined in yaml files, and two image files are also required. The example below is taken from a working example in my kitchen using the Logitech MX brio. Unit and functional tests in the ips_cam repo include an earlier example developed with the MS LifeCam Studio.
In any of the configuration files, ips_cam_node comprehends two special path prefixes. This applies to all settings which resolve to file paths. Acceptable prefixes are:
~: your home directory$PKG: the package build directory. This is used in testing.
In the examples below, it is assumed that all the files lie in a directory in your home directory called ~/IndoorPositioningSystem/ips_config_brio. Currently these files are present in the example_configs directory of this package (in ips_config_brio).
node_params.yaml
ips_cam_node has numerous ROS parameters. These will default to values set in the class constructor/init code. Needless to say, all these defaults are probably wrong! An example node_params.yaml file is:
/**:
    ros__parameters:
      video_device: "/dev/video0"
      framerate: 30.0
      io_method: "mmap"
      frame_id: "camera"
      pixel_format: "mjpeg2rgb"  # see usb_cam/supported_formats for list of supported formats
      av_device_format: "RGB24"
      image_width: 1280
      image_height: 720
      camera_name: "test_camera"
      ics_params_file: "~/IndoorPositioningSystem/ips_config_brio/ics_params.yml"
      tracking_params_file: "~/IndoorPositioningSystem/ips_config_brio/tracking.yml"
      autofocus: false
      focus: 36
      auto_white_balance: false
      white_balance: 4000
      autoexposure: true
      exposure: 300
This file defines camera device settings and the ips_cam_node node parameters. It also defines the paths for the files below. Note that focus is fixed - this causes a stable camera calibration. Surprisingly, this logitech camera - on the raspberry pi 4 - provides a higher framerate when set to autoexposure. auto_white_balance can also effect frame rate, as can backlight_compensation. backlight_compensation appears to result in a better image quality. This v4l2 control needs to be added to ips_cam_node. Thus far, I have set it via:
v4l2-ctl --set-ctrl=backlight_compensation=1
ics_params.yml
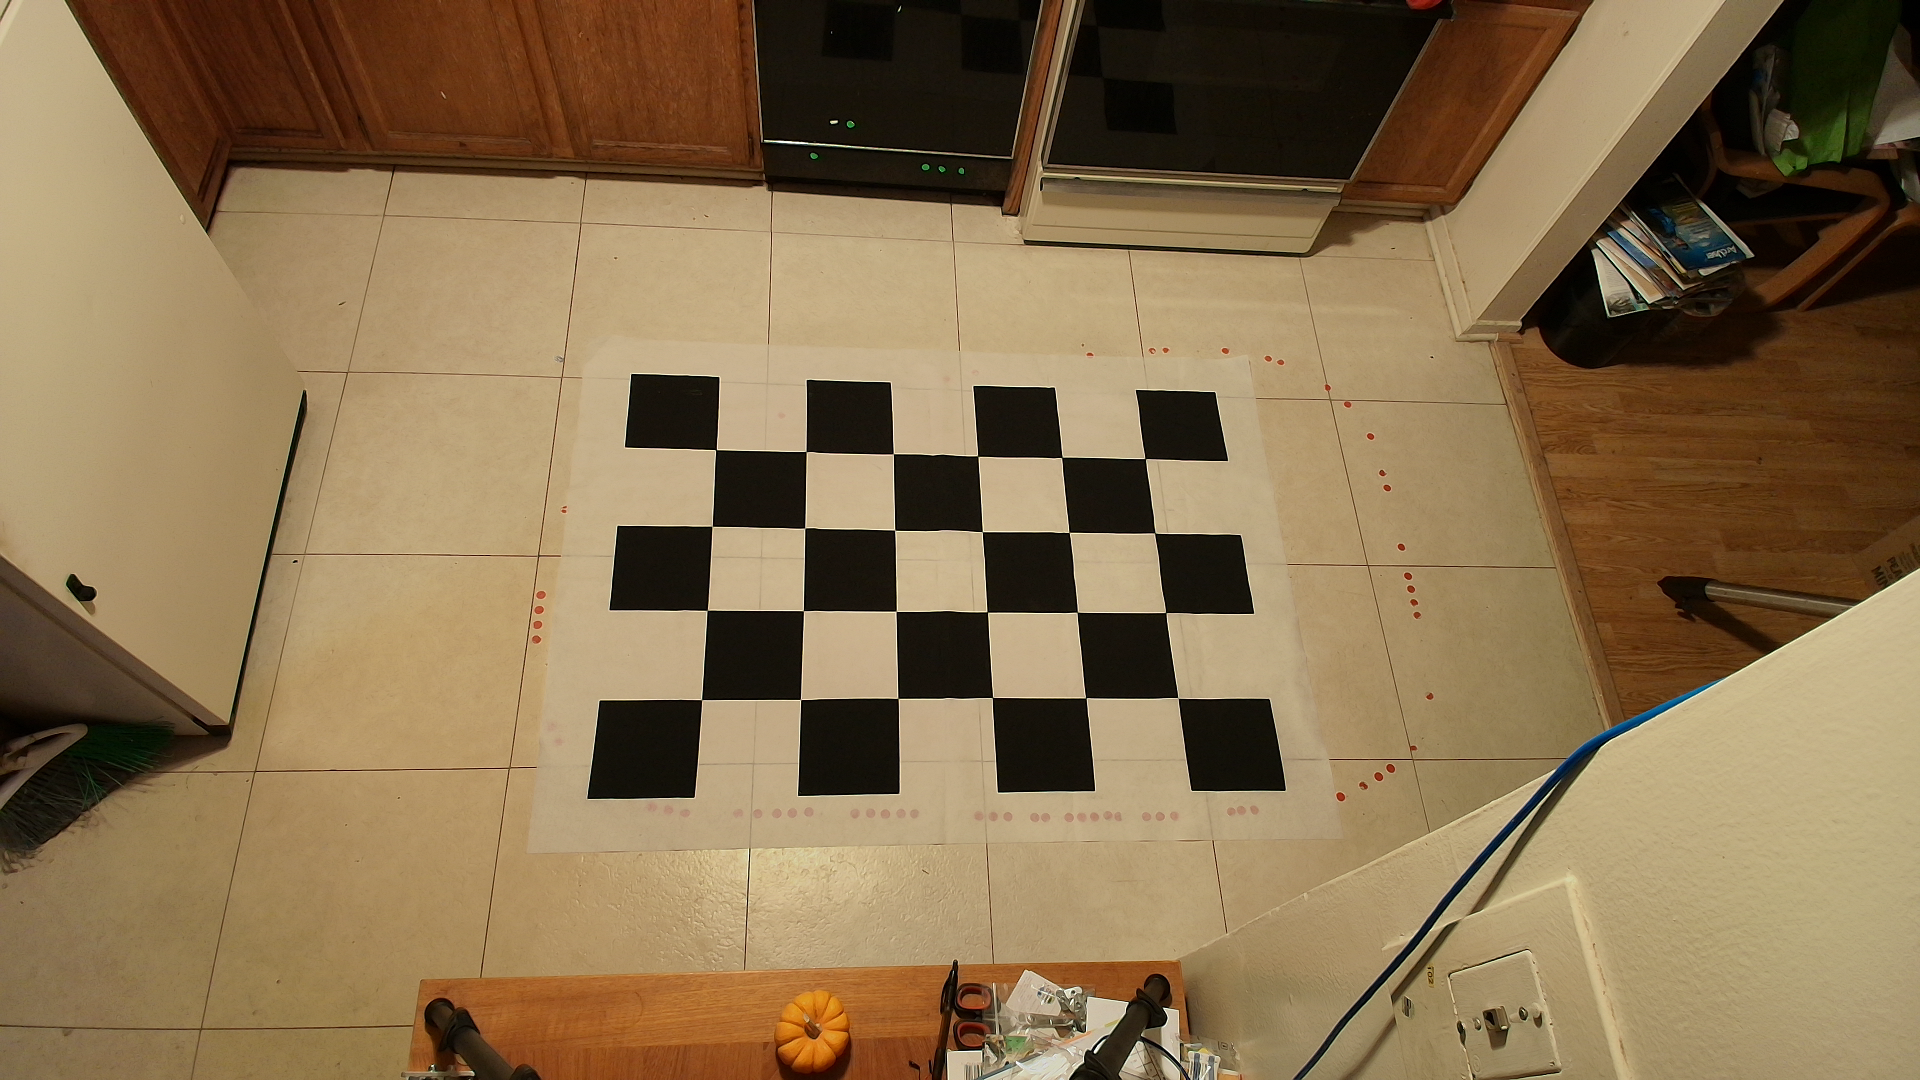
This file defines everything needed to interpret the coordinate system chessboard - I use an enormous fabric pattern I found online, which I place on the floor for calibration and the definition of the world coordinate system - also known as the ICS (Indoor Coordinate System). During robot operations, I stash the pattern somewhere else. And take care not to bump the camera!
%YAML:1.0
---
intrinsics_file : "~/IndoorPositioningSystem/ips_config_brio/camera_intrinsics.yml"
checkerboard_image_file : "~/IndoorPositioningSystem/ips_config_brio/im_ref_2025_12_29.png"
origin_image_file : "~/IndoorPositioningSystem/ips_config_brio/im_ref_aruco_2025_12_29.png"
cbExtentX: 6
cbExtentY: 4
cbBlockSize: 198.0
origin_tag: 1
origin_tag_z: 0.0
In this case, the pattern block size is 198mm and the chessboard is 6x4 (internal corners). In order to define the origin, I take an image with an ARUCO tag placed at the origin, in this case tag #1 of DICT_5x5_50 (this needs to be exposed as a node parameter). The YAML file format here is chosen to be friendly with OPENCV’s yaml file reader.
The image of the chessboard pattern for the determination of the ICS is:
Since there are two possible coordinate systems (origin at upper right or lower left), ips_cam requires another image with the tag of choice at (0,0). Thus:
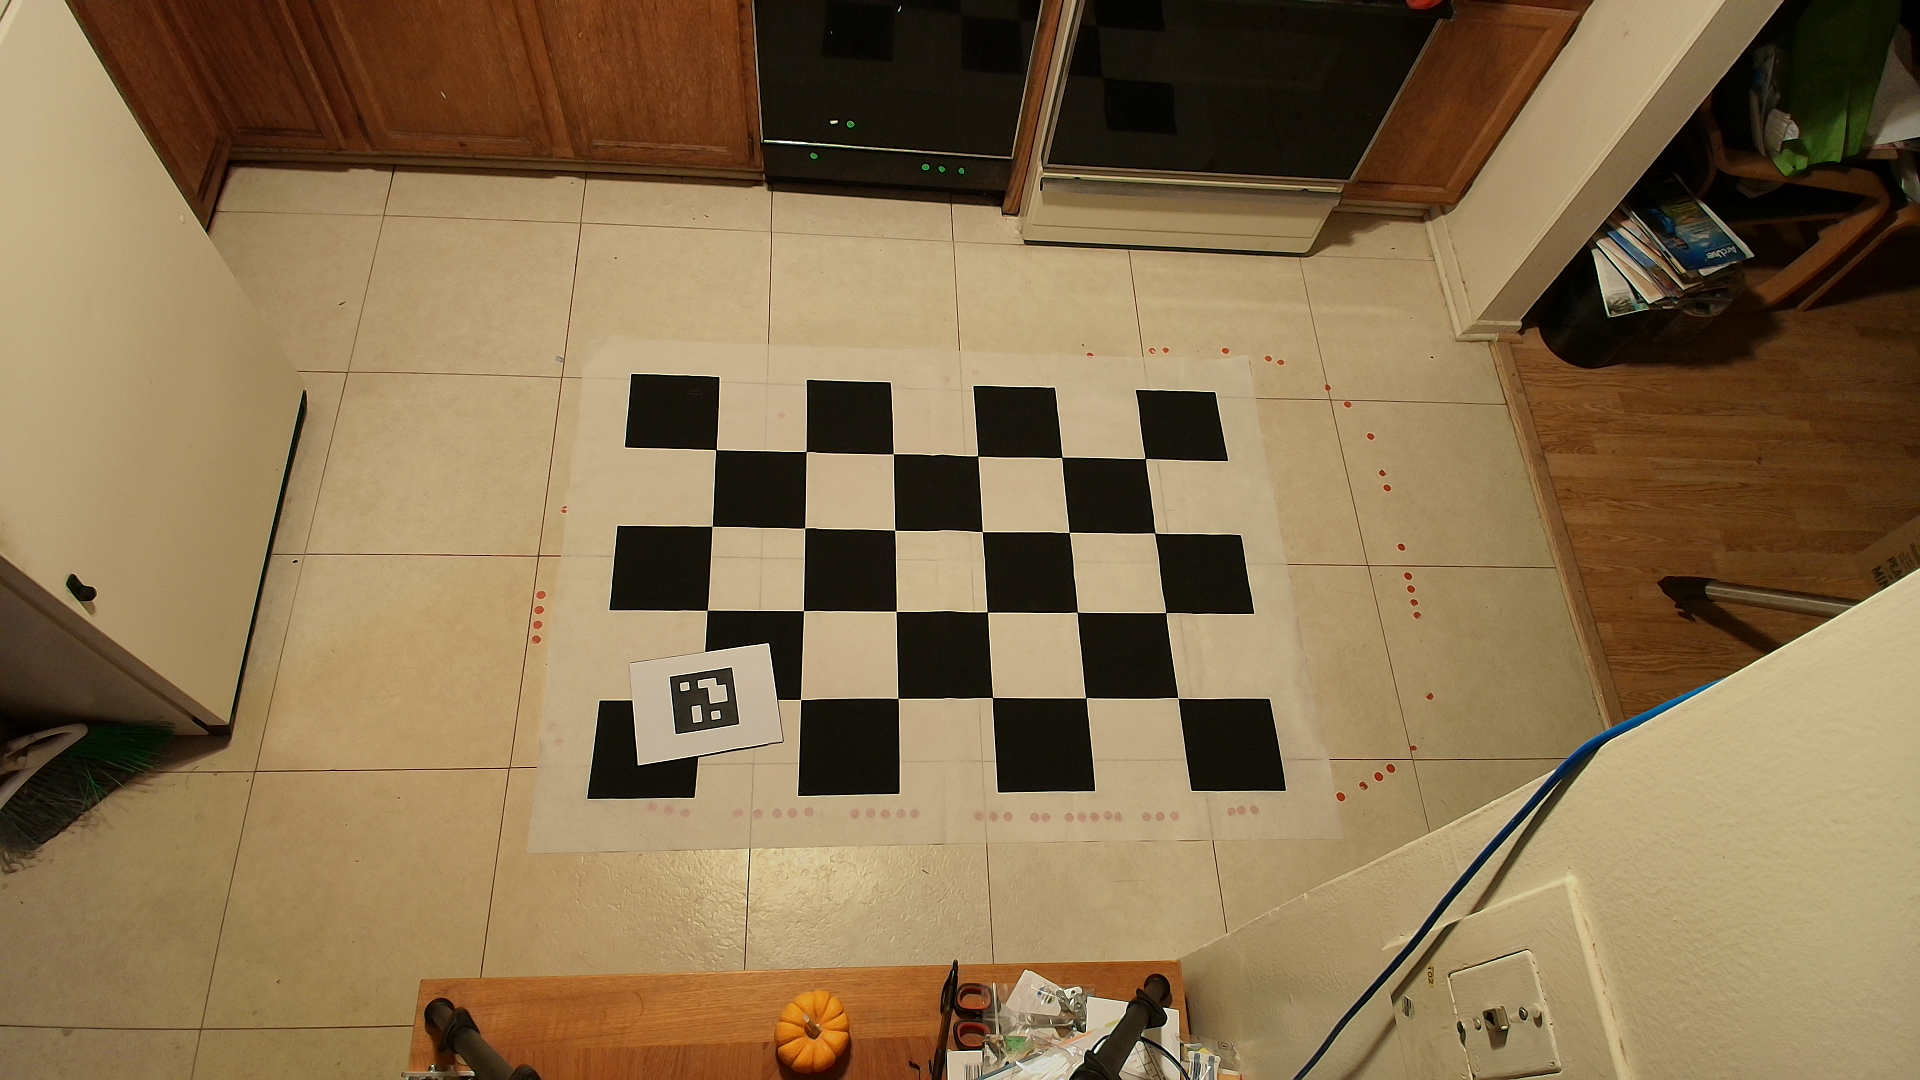
So that X in the ICS is roughly left to right in the image, and Y is from bottom to top. Pose topics are reported in mm using the configuration files included here.
camera_intrinsics.yml
This file is the output of offline calibration. I have been using MATLAB’s camera calibration app - which is fairly interactive (although glitchy). An additional bit of code is required to translate the matlab calibration to OPENCV-friendly data. The YAML file format here is chosen to be friendly with OPENCV’s yaml file reader.
%YAML:1.0
---
camera_matrix: !!opencv-matrix
   rows: 3
   cols: 3
   dt: d
   data: [1126.43502267332, 0, 956.938294322799, 0, 1135.75041995548, 582.392914614646, 0, 0, 1]
dist_coeffs: !!opencv-matrix
   rows: 1
   cols: 5
   dt: d
   data: [0.128339234956909, -0.19722106638232, 0, 0, 0]
image_height: 1080
image_width: 1920
Currently distortion is not corrected for in ips_cam_node processing. This will be investigated/addressed as more testing of ips_cam position data is implemented. The YAML file format here is chosen to be friendly with OPENCV’s yaml file reader.
tracking.yml
This file defines the ARUCO tags to track:
%YAML:1.0
---
tag : [1, 3, 2]
tag_z : [5.0, 126.0, 5.0]
In this example, I am tracking tags #1 and #2 on 5mm foam-core cards, and #3 tag mounted on a differential drive robot - which happens to be 126mm above the floor. The PoseStamped topics corresponding to these objects will be published to /object_1, /object_2 and /object_3. The YAML file format here is chosen to be friendly with OPENCV’s yaml file reader.
Running
Initialization
As noted above, we need two images to set up our local robot coordinate system (not counting all the images/shenanigans associated with determining camera intrinsics). In order to accelerate this process, the ips_cam package offers a node which snapshots photos for you. Usage of this node is:
ros2 run ips_cam cam_node --ros-args --params-file <node_params_setup.yaml>
Although, in principle, one can adjust camera intrinsics for images of a different width and height (and this IS done with the tracking mode - see below), the current code requires that the image size in the camera intrinsics yaml file is the same as the images collected for setup (the next two images). I typically have a node_params_setup.yaml file for the initialization/setup task (this section) and a node_params.yaml file with my tracking imaging parameters - which I usually adjust to achieve a faster frame rate (e.g, from YUYV to MJPEG). The file I used (in example_configs/ips_config_brio/node_params_setup.yaml) is :
/**:
    ros__parameters:
      video_device: "/dev/video0"
      framerate: 30.0
      io_method: "mmap"
      frame_id: "camera"
      pixel_format: "yuyv"  # see usb_cam/supported_formats for list of supported formats
      image_width: 1920
      image_height: 1080
      camera_name: "test_camera"
      ics_params_file: "~/IndoorPositioningSystem/ips_config_brio/ics_params.yml"
      tracking_params_file: "~/IndoorPositioningSystem/ips_config_brio/tracking.yml"
      autofocus: false
      focus: 36
      auto_white_balance: false
      white_balance: 4000
      autoexposure: true
      exposure: 300
Then, one can place the coordinate chessboard and do (for example):
ros2 service call /ips_cam/snapshot ips_cam/srv/Snapshot "{filename: '/tmp/im_ref.png'}"
And, after placing the aruco tag on the origin of choice:
ros2 service call /ips_cam/snapshot ips_cam/srv/Snapshot "{filename: '/tmp/im_ref_aruco.png'}"
Then this node can be killed and the tracking mode started (next section). The two image files produced should be placed somewhere advisable and referenced properly in the <ics_params.yml> file.
Tracking
After defining the configurations in the previous section, running the node is straightforward. You do have some additional options to allow flexibility of use. In particular, the image height and width defined by the <node_params.yaml> file can be updated to chase better tracking throughput and latency. In particular, I have found that a raspberry pi4 with a logitech brio running at 1280x720 (720p) can manage ~30 hz update rate with a latency of ~50 ms using MJPEG. This is measured by executing (for an object tagged with aruco tag #1):
ros2 topic hz /object_1
ros2 topic delay /object_1
Starting the tracking can be done as follows:
ros2 run ips_cam ips_cam_node --ros-args --params-file <node_params.yaml>
where <node_params.yaml> resolves to the path of the file described above.
Supported formats
Device supported formats
To see a connected device’s supported formats, run the ips_cam_node and observe the console output.
An example output is:
This device supports the following formats:
        YUYV 4:2:2 640 x 480 (60 Hz)
        YUYV 4:2:2 640 x 480 (30 Hz)
        YUYV 4:2:2 640 x 480 (24 Hz)
        YUYV 4:2:2 640 x 480 (20 Hz)
        YUYV 4:2:2 640 x 480 (15 Hz)
        YUYV 4:2:2 640 x 480 (10 Hz)
        YUYV 4:2:2 640 x 480 (7 Hz)
        YUYV 4:2:2 640 x 480 (5 Hz)
        YUYV 4:2:2 160 x 120 (60 Hz)
        YUYV 4:2:2 160 x 120 (30 Hz)
        .
        .
        .
Other helpful commands for grokking your camera are:
v4l2-ctl -l
and
v4l2-ctl -V
All of these tools are paths to discovering or implementing support for a given camera/format/controls.
Supported IO methods
The original internal usb_cam driver supports three different IO methods:
read: copies the video frame between user and kernel spacemmap: memory mapped buffers allocated in kernel spaceuserptr: memory buffers allocated in the user space
ips_cam has only been tested using mmap.
To read more on the different methods, check out this article that provides a good overview
of each. Also see the original usb_cam ROS2 package.
Image Compression
Currently ips_cam supports YUYV and MJPEG. See the
IpsCamNode::take_and_process_image()
method. This method needs to know 2 things about the frame stream: the OPENCV pixel type (e.g., CV_8UC2) and how to convert the (color) frame to monochrome. Note that the down side of (M)JPEG is lossy compression. It does not seem to be having a huge impact on tag tracking, but I have not done a detailed analysis for moving objects. Originally, this code was running at ~22Hz in YUYV 1280x720, but, for some unknown reason (perhaps v4l2 updates in ubuntu) this BW was not repeatable. It is possible there were camera settings made inadvertently which caused the RPI4 to support higher BW over it’s USB3 ports.
Address and leak sanitizing
Incorporated into the CMakelists.txt file to assist with memory leak and address sanitizing
is a flag to add these compile commands to the targets.
To enable them, pass in the SANITIZE=1 flag:
colcon build --packages-select ips_cam --cmake-args -DSANITIZE=1
Once built, run the nodes executable directly and pass any ASAN_OPTIONS that are needed:
ASAN_OPTIONS=new_delete_type_mismatch=0 ./install/ips_cam/lib/ips_cam/ips_cam_node_exe <params>
After shutting down the executable with Ctrl+C, the sanitizer will report any memory leaks.
By default this is turned off since compiling with the sanitizer turned on causes bloat and slows down performance.
Documentation
Documentation (e.g. Doxygen) support/generation is a pending project.
License
ips_cam is released with a BSD license. For full terms and conditions, see the LICENSE file.
Authors
See the AUTHORS file for a full list of contributors.